Album Studio Guide
Select a topic to get started.
To start
Layout
How to Order
Installing the software
Windows
- Select the installation package for Windows: SOFTWARE > download album studio
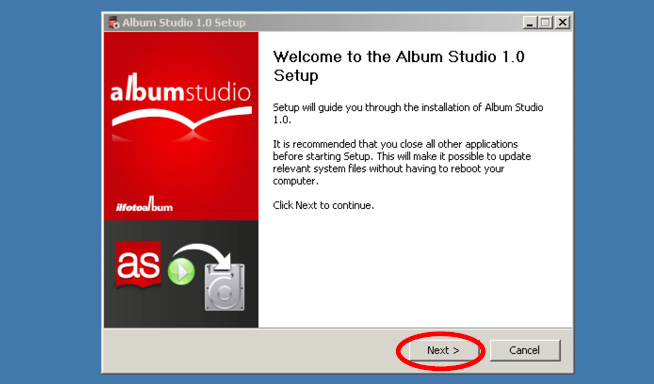
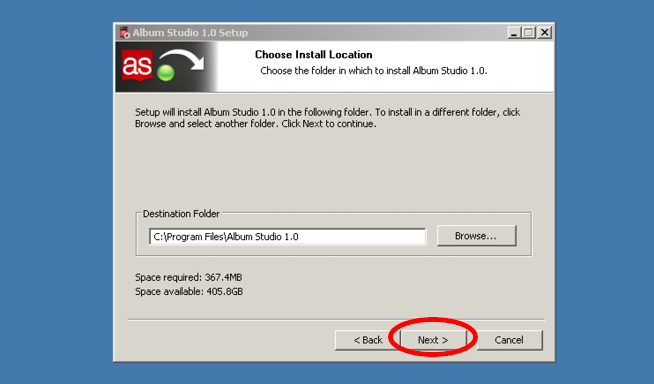
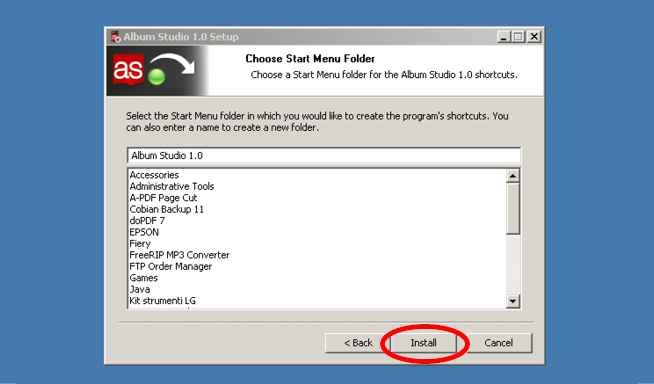
- Launch program installation Album Studio by double clicking on “run”
- Follow the guided procedure by clicking on “Continue” then on “Install”.
- Once the guided procedure is completed, launch the Album Studio 1.0 application by double clicking on the icon on the desktop.
Mac OSX
- Select the installation package for MAC: SOFTWARE > download album studio
- Launch the program installation Album Studio 1.0 by double clicking on the icon
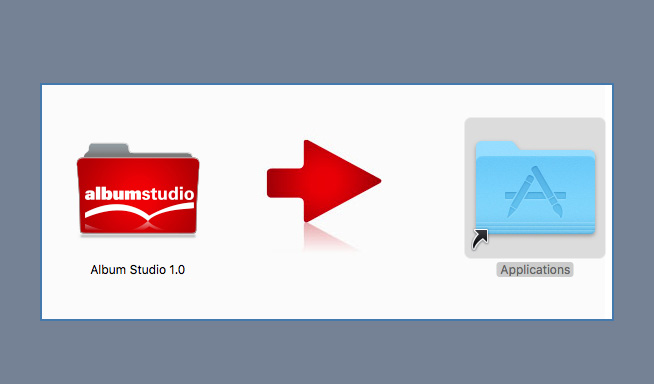
- Drag the file from the installation window to the link in the Applications folder.
- Close the window and click on the Applications folder > Run the Album Studio 1.0 program
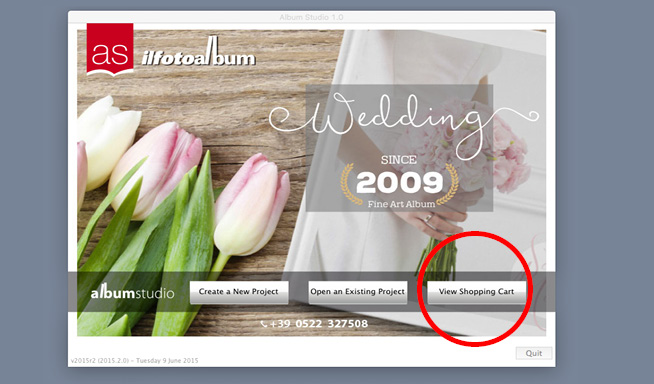
Home screen
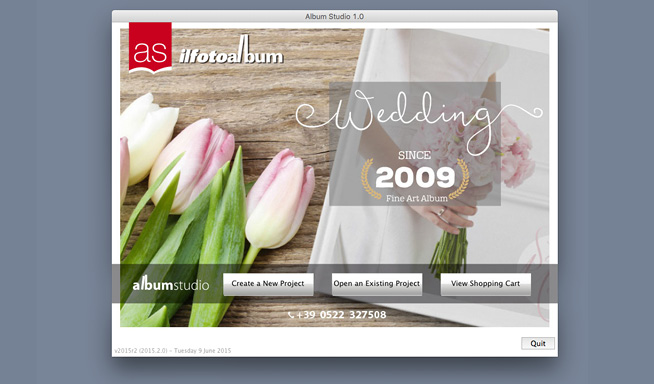
The Album Studio 1.0 home screen has three buttons:
Create a New Project
For starting a new project.
Open Existing Project
It lets you open a project started earlier or complete the order of a previously saved project.
View Cart
It shows you which products have already been put in the cart and lets you complete the purchase with a single order.
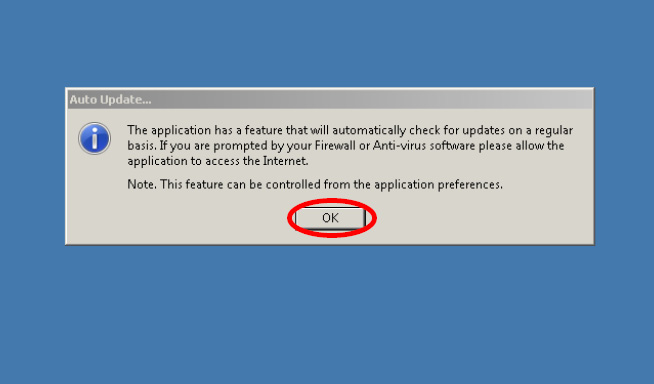
At startup Album Studio 1.0 automatically detects available updates. Updates are totally free and can cause no problems to the computer on which Album Studio 1.0 is installed.
How to create a new project
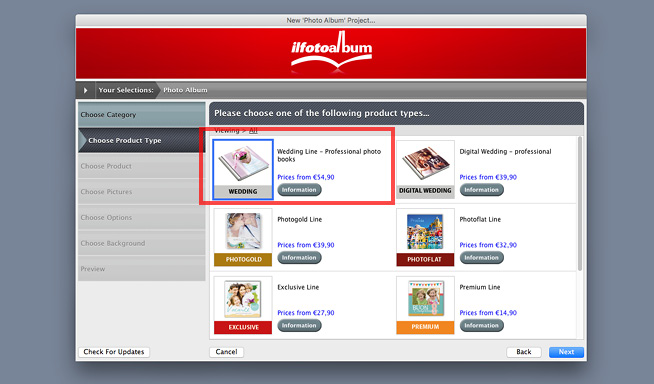
Selection of product category
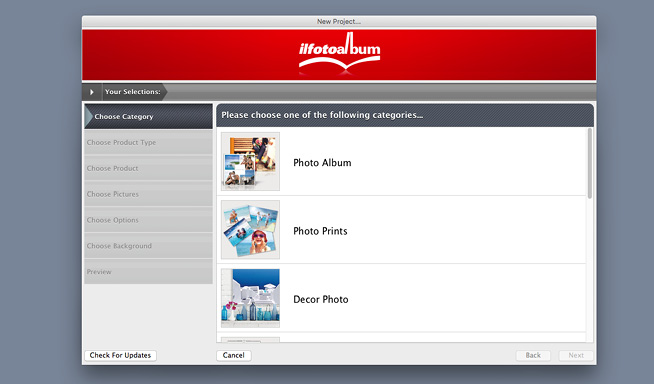
To create a new project you need to click on “Create a New Project”.
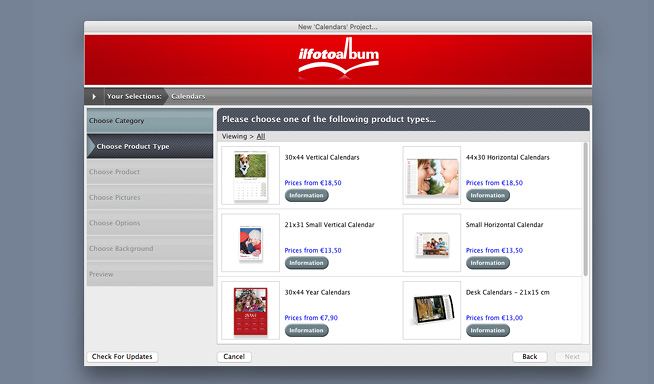
From here you can enter the general categories: Photo Album, Photos, Decor Photos, Calendars and Photo Ideas.
Each of these contains the types of items from which you can choose the product you want.
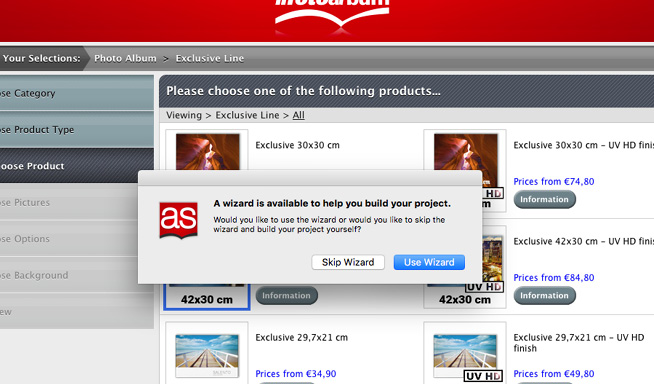
Layout assistant
After choosing the type of product, click on “use assistant” if you decide to use this support. By adding photos and choosing the background you can automatically design the layout of the selected product. Later you can make all the changes you want. In case you don’t wish for help by the assistant, simply skip this step by clicking on “skip assistant”.
Create a professional photo book
To start…
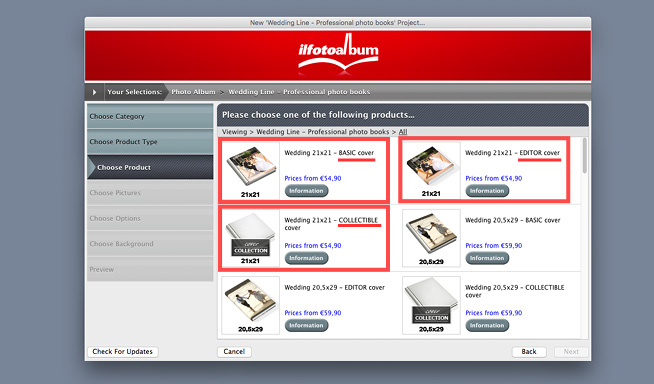
To design the layout of a Professional Photo Book you need to choose carefully the type of cover you want for your project. Each size can be ordered with covers chosen from 3 groups: BASIC (included in the price list); EDITOR (total control of graphics by the customer); COLLECTIBLE (choice of over 100 cover types in leather, silk and much more).
Please note: The initial steps for the creation of a Wedding Line professional photo book are the same for the Photogold and Digital Wedding lines.
Choose the type of cover carefully
First you need to select one of the following lines: “Wedding line”, “Digital line”, “Photogold line”. All the products are divided by size and type of cover. Each photo book can be made with three different types of cover:
- BASIC cover,
- EDITOR cover,
- COLLECTIBLE cover.
The selected model can then be customized in detail at the time of ordering, therefore it is important to remember the choice you made, especially when you have selected a collectible cover.
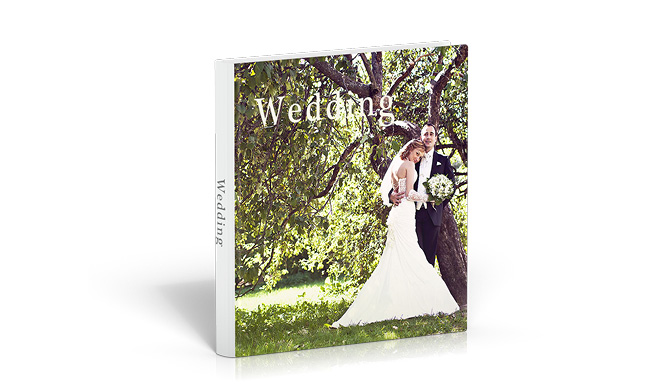
BASIC cover
The software interface will be different according to the type of product and cover that was chosen in the initial stage. In the case of a printed front cover, the BASIC version of the cover page will consist only of the front. This is why you will only be able to design the layout of the front cover in the software. The back of the cover is in leather (in colours to choose from at the time of purchase).
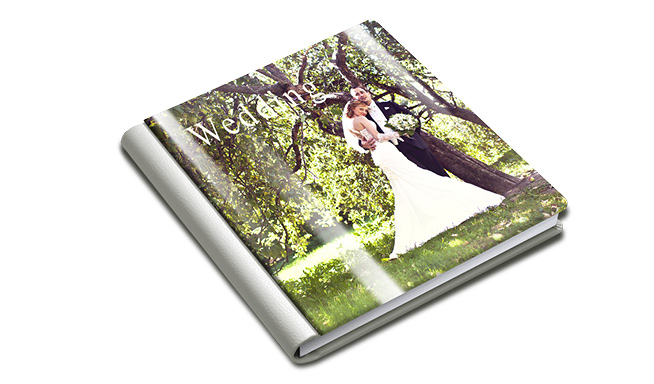
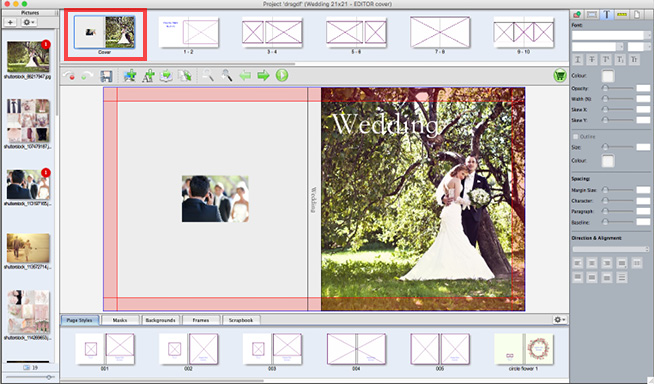
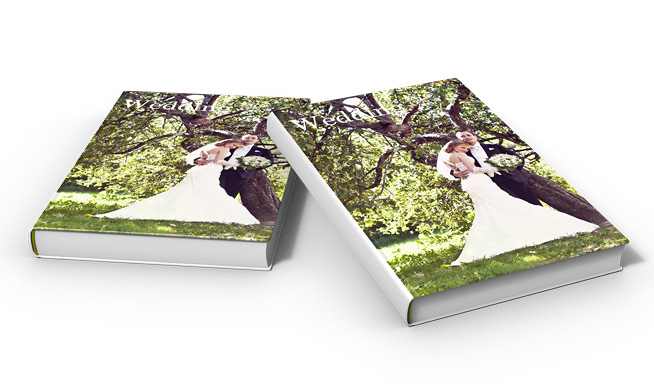
EDITOR Cover
In the case of an entirely printed cover (EDITOR version), it will consist of front, spine and back. The thickness of the spine will be calculated automatically based on the added pages, and the software will signal the change in the spine measurement. You will be able to customize the cover of your album with photos, text and other graphics elements. You can also use our graphics presets to create a cover with a unique design.
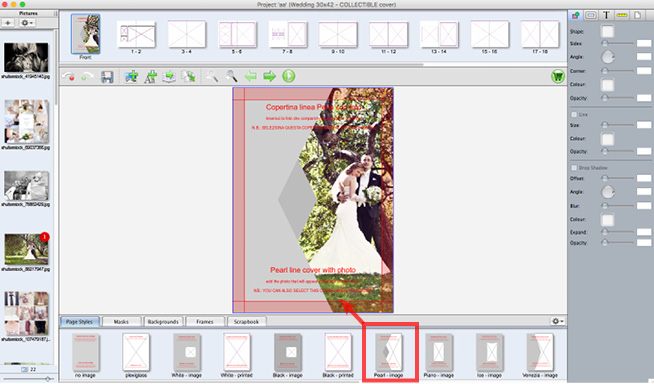
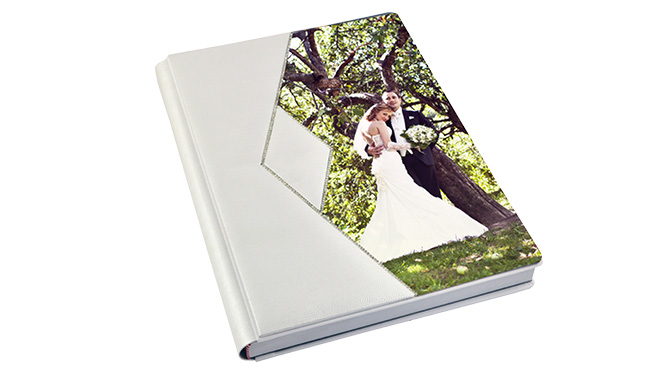
COLLECTIBLE cover
If you choose a COLLECTIBLE cover (more than 100 types to choose from on the website), drag the layout of the selected collectible cover onto the cover front. If the cover you choose does NOT have a photo on the front, just select the last page style on the bottom right, which does not have a photo insert on the cover. You will make the final choices about your type of Collectible cover (colour, type of finish, etc) at checkout, when you place your order.
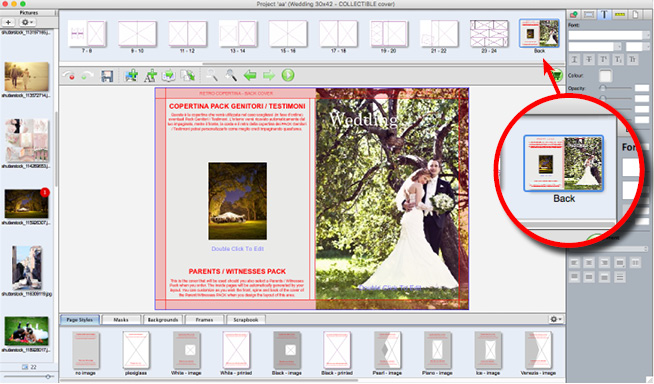
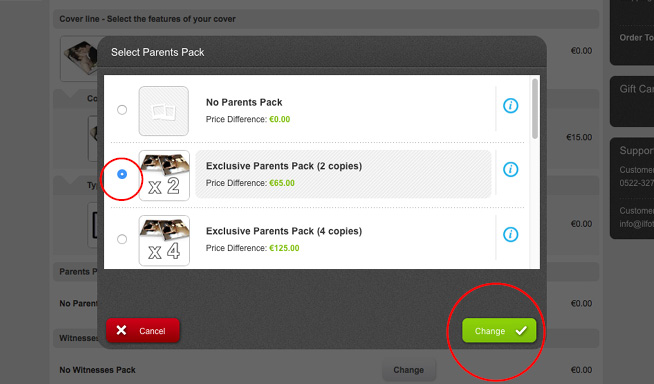
Layout of the Parents Pack cover
Some album types include a cover layout for the parents or witnesses pack. The layout page for these two packs is called “retro” and contains all the instructions for the correct layout of their cover.
If you do not want a parents (or witness) pack, simply do not insert elements in this page. If you do, you will also need to design the layout of this section and when you order (checkout) you will need to select “pack” and the number of copies.
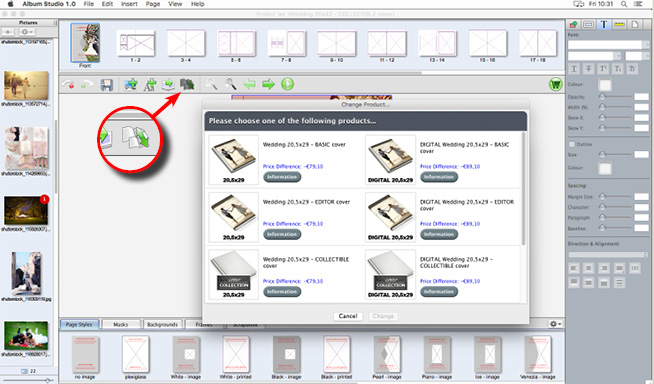
Changing photo album or cover type
During execution of the project you can change the product or type of cover without redesigning the layout of your work.
You just need to select the “Change Product” button and choose a new type of photo book. The layout style will be automatically adjusted by the program. However, this may result in some unwanted shifting of elements on the page. We recommend you double check your work before proceeding with the purchase.
All the Album Studio features (see layout section) can be used for the layout of the Professional line of Photo Books: adding text, applying backgrounds, marks, frames and clip art and importing and changing images with a variety of effects and customizable layout styles.
Once the layout is complete you can proceed to the purchase by clicking on the green “cart” button. Now you can select all the specifications of the album you created (type of paper, type of cover, parents pack, etc.).
For further information on how to manage all the product options during checkout, please see the Optional Choices section (final part of the “How to Order” section).
Create a Photo Calendar
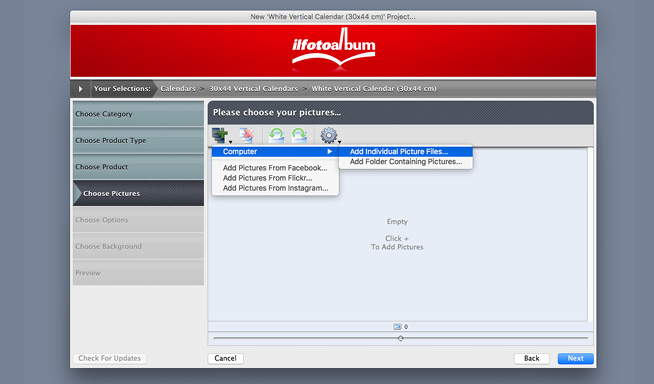
Upload images
The initial layout of a product in the “Calendars” category requires a few more steps than the procedure for photo albums: after choosing the type and product you will need to upload the images to add to your calendar.
Optional choices
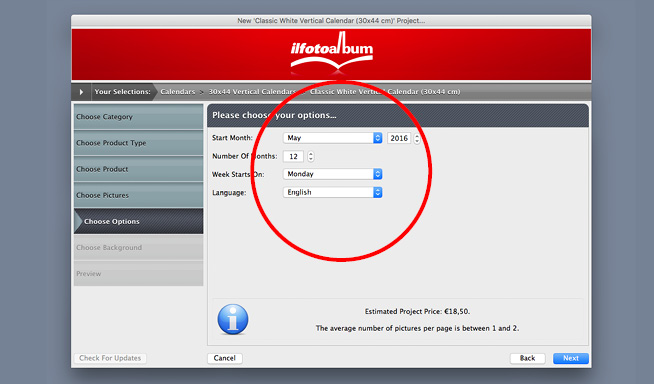
After uploading the photos, Album Studio 1.0 lets you select the month, year and day of the week that you want for your calendar. At the bottom of the page, the software will produce a preview of how many images are on each page and show the cost of the product.
Selection of starting date of the calendar
In this stage it is important to choose the correct starting date of the calendar. Normally, the software synchronizes this date with the current date on your computer. Next, a preview of the product will be uploaded and you will need to name the project.
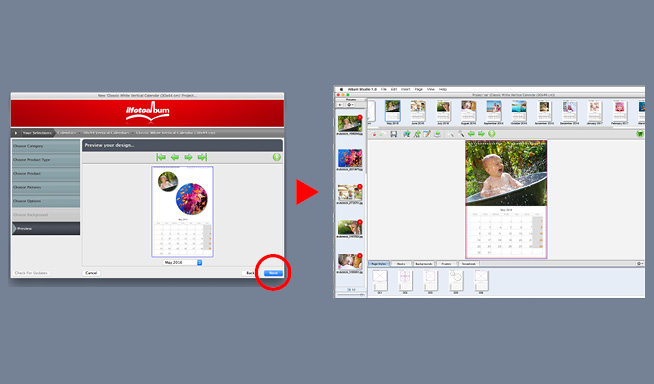
Temporary automatic layout
This “mandatory” automatic layout stage is only temporary: once you have completed the first steps you can personalize the calendar as you wish with all the tools in the software interface (photos, text and date).
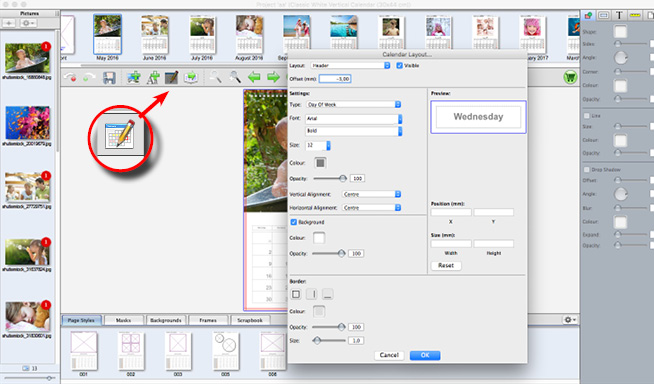
Change the look of the calendar date display
If you wish to thoroughly customize the calendar and change the date display, on the calendar section toolbar there is a button for customizing the calendar date display. Just click it to edit the date, its fonts and its colours.

Layout and features
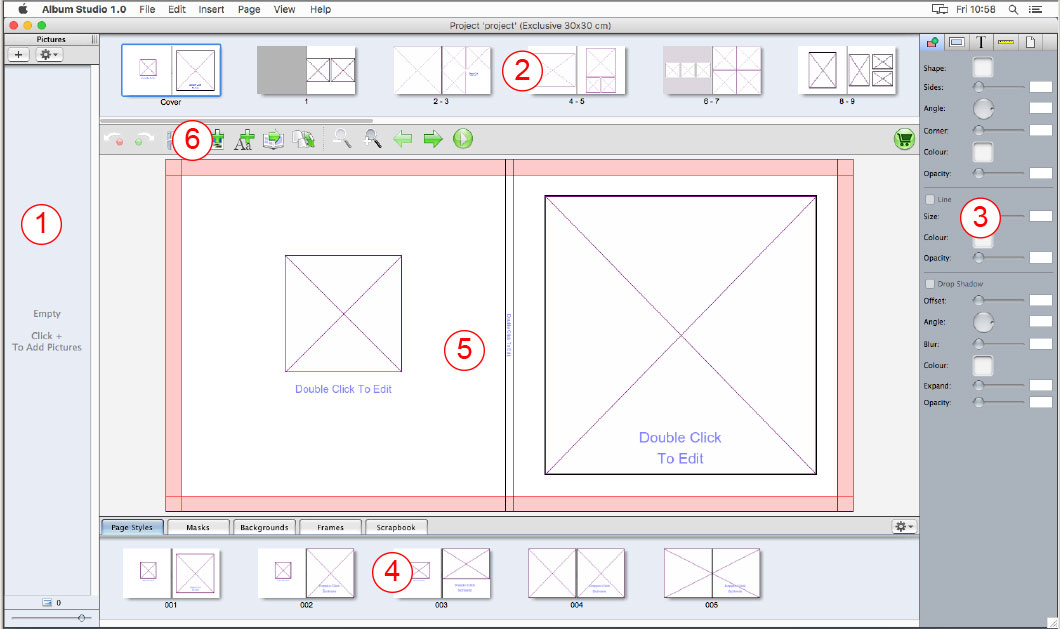
1. Control panel
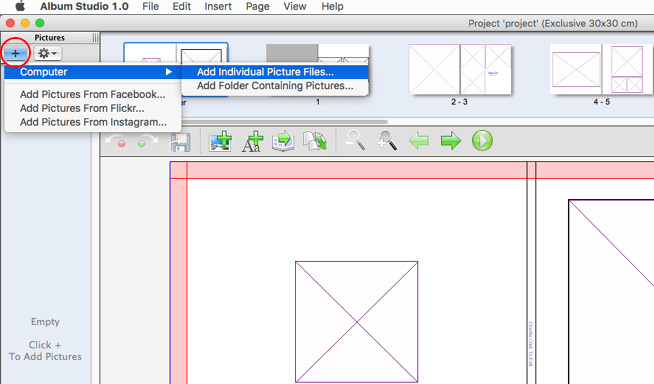
Add photos to the project
In this panel you can upload and manage photos added to the project. To upload new photos just click on the “+” symbol and choose the source of the upload. To add images just select the photo thumbnail in the left panel and drag it to your workspace. A number will appear in the upper right corner of each photo showing the number of times it has been added to the project.
Sorting photos
By clicking on the clog-wheel a window will open with photo sorting options. To aid the composition of the work, you can assign or select a category, sort the photos according to a specific criterion (by name, date, rating, size, etc.), display the size and ratings or delete the entire list of uploaded photos.
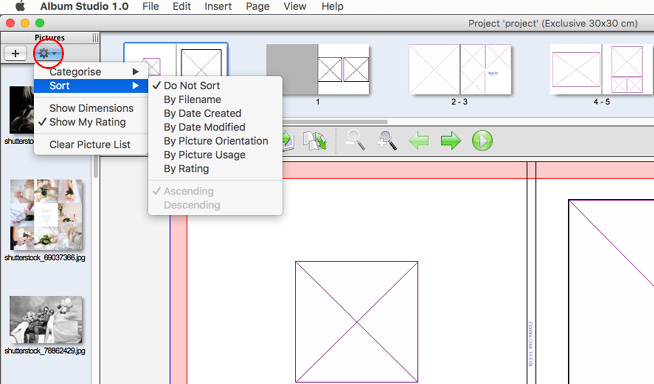
Image preview
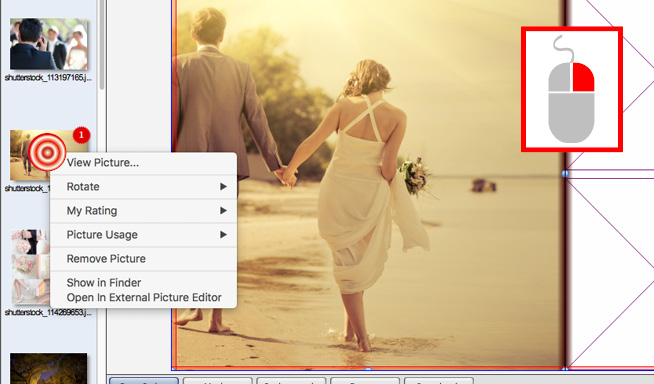
Right clicking on the photo will open a window containing editing options for that single photo. You can see a preview, rotate the image, rate it, delete it, show the file in its original folder and open the photo with an external program.
To set up the software you will use to edit the photo, in the menu bar click on FILE > PREFERENCES > external photo retouching software.
2. Page preview
View page order
Here you can check your project: the pages are arranged in sequential order and you can use the cursor to quickly scroll through them.
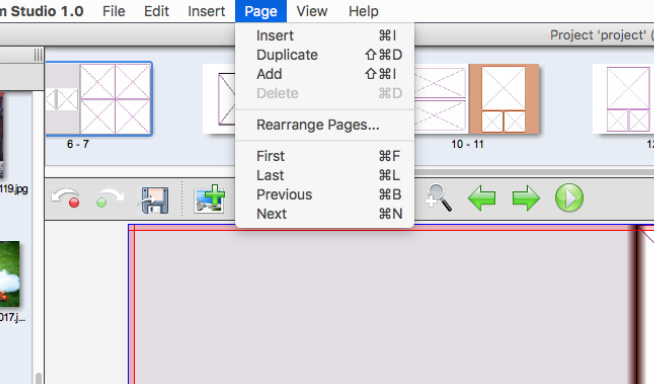
Add pages to the photo album
To add more pages: menu bar > PAGE >
INSERT > additional pages will be added inside the project, before the selected page.
DUPLICATE > with this option, the pages you select are duplicated.
ADD the pages will be added after the last page of the project.
You can also delete added pages by selecting DELETE.
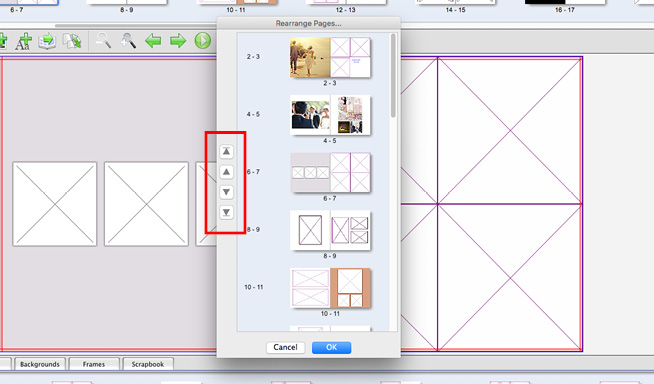
Change the page sequence
In this menu you can also change the chronological order of pages. You can move the selected pages using the side arrows. Once you are done, you just need to confirm the action.
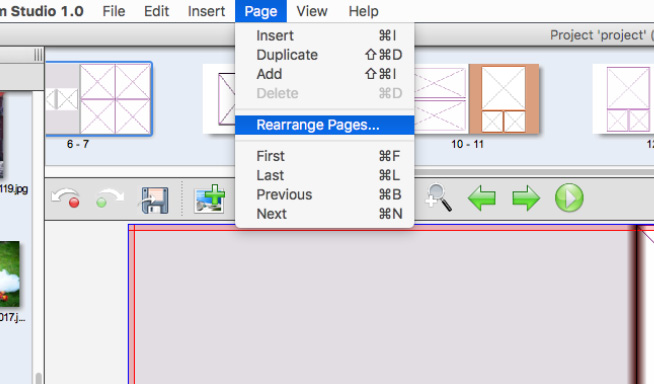
Confirm page rearrangement
In this menu you can also change the chronological order of pages. You can move the selected pages using the side arrows. Once you are done, you just need to confirm the action.
3. Tools panel
This panel provides useful tools for photo retouching, for customizing images and text and for precise work.
Managing shapes
This panel lets you manage all the attributes of the geometric shapes added to your layout. To add a new shape, select in the menu bar: INSERT > SHAPE > rectangle, oval, polygon, line. These tools let you use shapes, colours, borders and shadows.
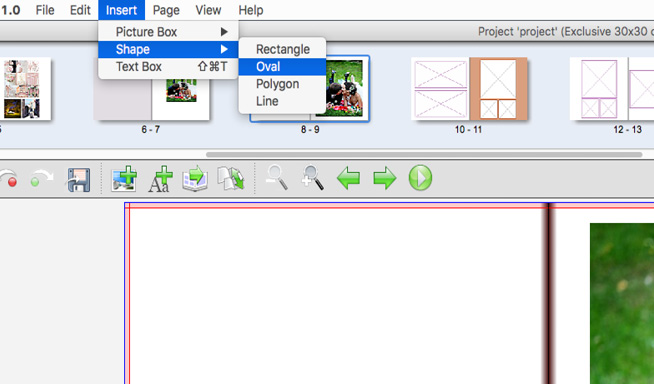
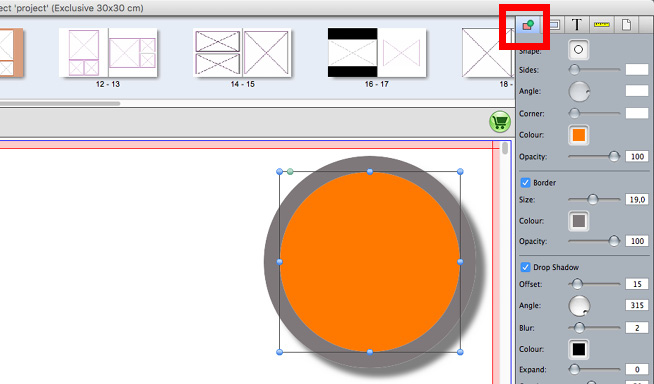
Image management
The image management panel lets you edit image colour, add borders and vignetting, and crop and enlarge parts of the photos in your layout.
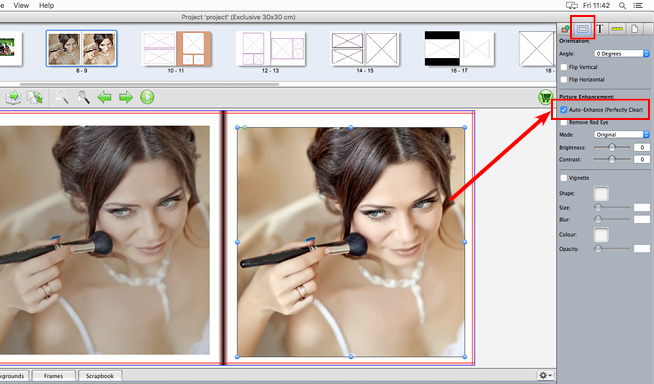
Colour correction of images
The Perfectly Clear Plug-in improves the image by correcting colour and brightness, to ensure a better post-production image process in preparation for printing.
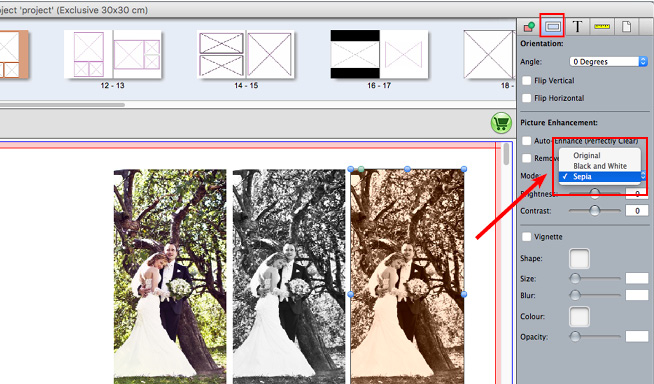
Black and white and sepia effect
In this panel you can also edit the colour image display by applying effects such black and white or sepia.
Resizing and positioning images
To resize images you can just move the cursor to the corners of the photo; for a more precise enlargement you can change the values in the units and rulers panel.
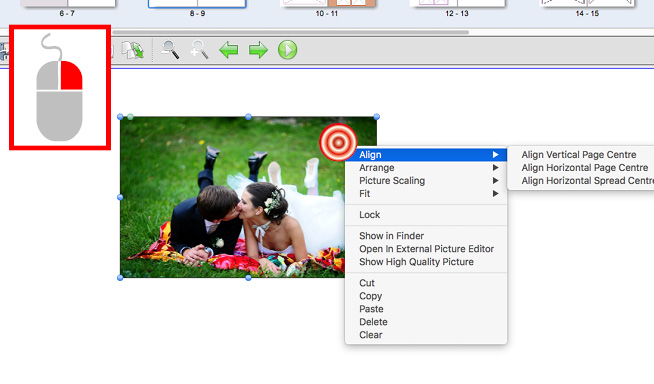
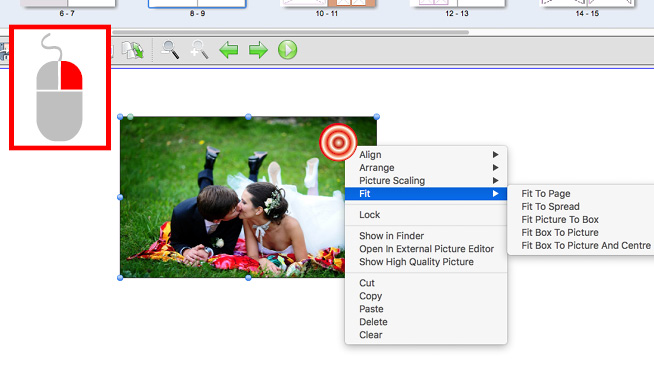
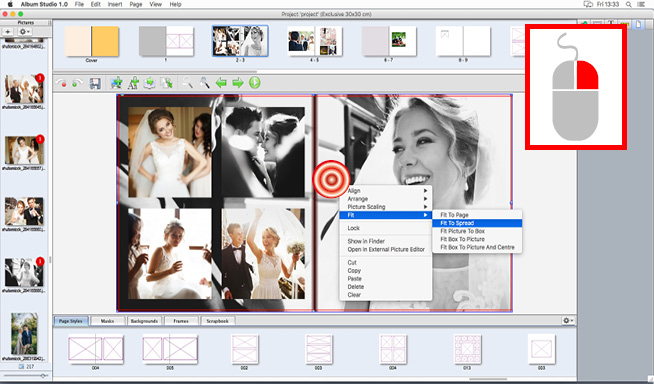
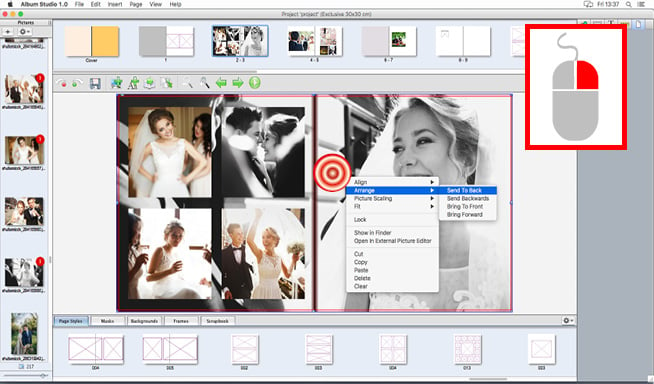
One of the available options is image alignment: just right-click on the photo, select ALIGN and the desired alignment. In the same way you can edit the image positioning in relation to the page or the frame.
Reframing a previously cropped photo
To change the visible area of the photo inside the frame, just double-click on the image to open the management window, then move the frame as you wish.

Rotating a photo
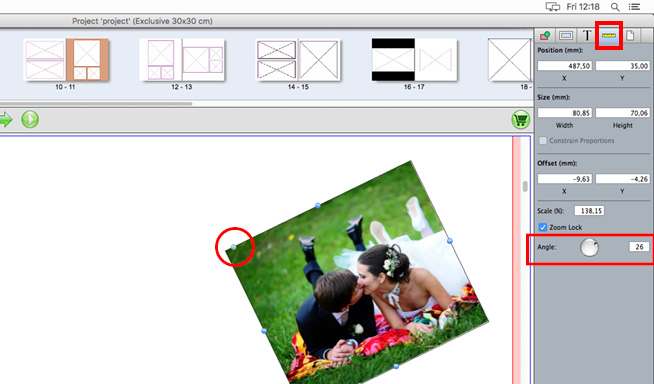
The image rotating tool is found in the units and rulers panel. You can rotate the image to any angle you wish.
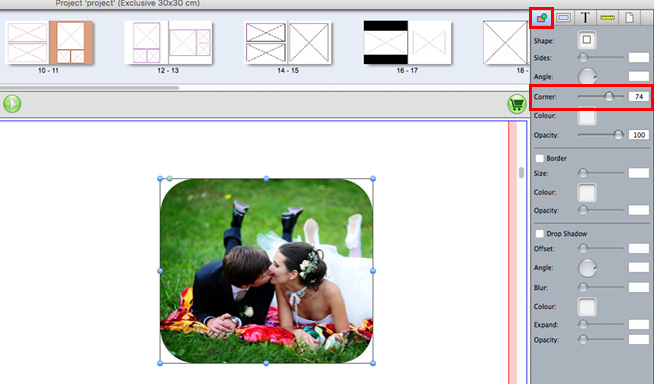
Rounding photo corners
The tool for rounding the corners of the image frame is found in the shape management window.
Making photos matte
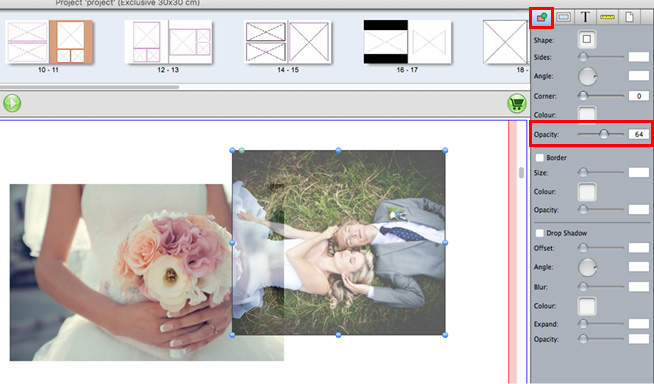
The tool for setting the opacity level of the image, in order to create transparency effects, is found in the shape management panel.
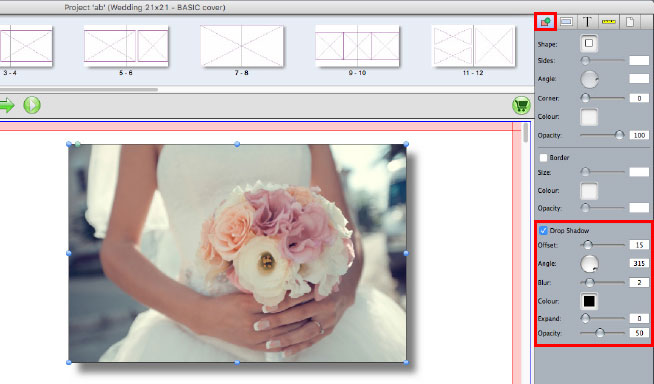
Adding shadows to the photos
The last section of the shape management panel lets you add and modify surrounding shadows.
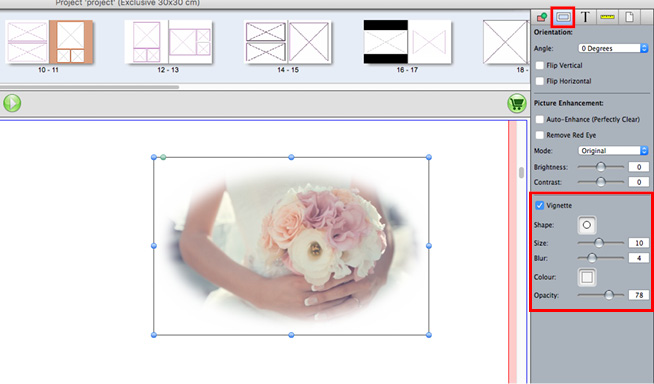
Adding vignetting on the photos
The vignetting function, for images only, can be activated in the photo editing panel.
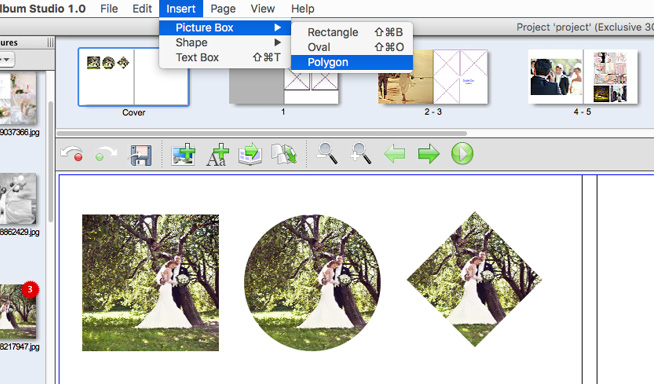
Creating an image frame with a shape other than a rectangle or square
To insert an image frame with a shape other than a rectangle, in the menu bar select > INSERT > IMAGE BOX > rectangle, oval, polygon. If you select polygon, you can set the number of sides of the polygon in the shape management side panel.
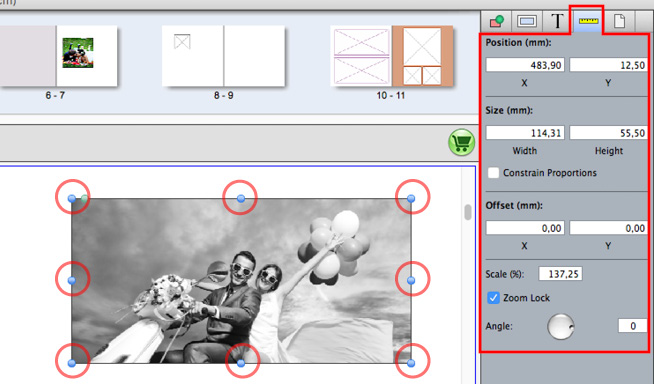
Using measurement units and alignment rulers
This panel contains a few basic functions for the measurement and precise positioning of elements in your workspace.
By entering the X and Y coordinates and sizes in mm you can position any element precisely. You can also edit the framing and rotation of the image.
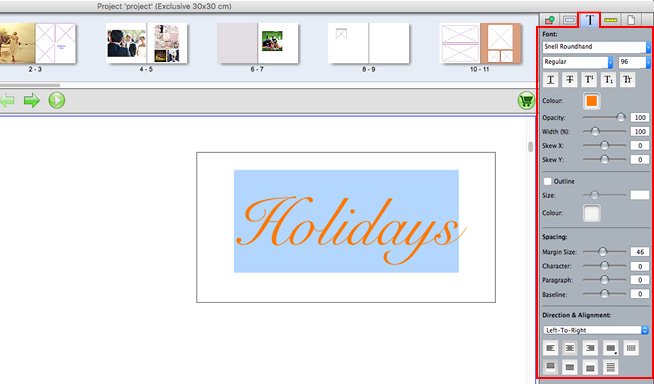
Text management
This panel lets you edit your text content. You can choose any type of font, size and colour, and adjust the alignment, spacing and the border around the text.
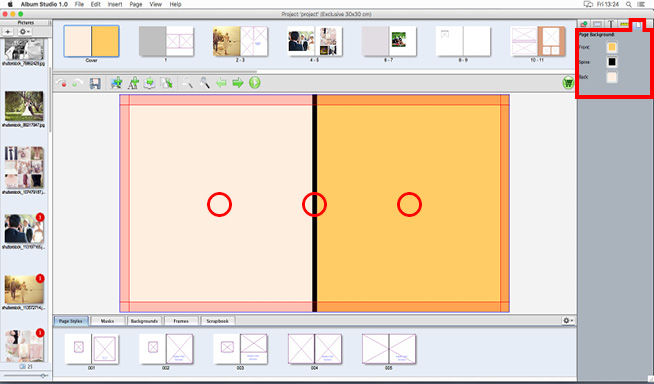
Background management
Lastly, there is a background management panel. The example shown here has a monochrome background, but backgrounds with different textures and motifs are available in the library in the backgrounds section.
Setting a photo as background
With Album Studio you can set a previously uploaded photo as background to the page or to facing pages. First you need to design the layout of the photo book pages with one of the several available templates.
When the internal structure of the pages is completed, select the background image and drag it onto the page.
Please note: It is important to drag the image to the white border around the images, not inside the frame.
To set the image as background, right click on the selected photo, then:
- ADJUST > ADJUST TO FACING PAGES. This way the photo will occupy the area of the facing pages precisely.
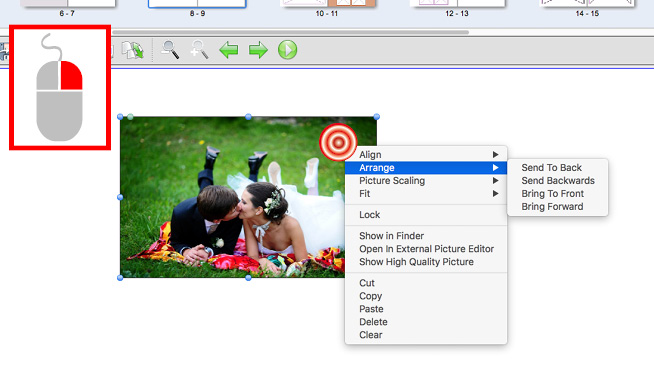
- To move the image to the background level, right click on it and select: ORGANIZE > MOVE BEHIND.
By following these few simple steps, the photo will now remain as a background.
4. Library
The library is divided into 5 categories, easily accessible at the bottom of the interface screen.
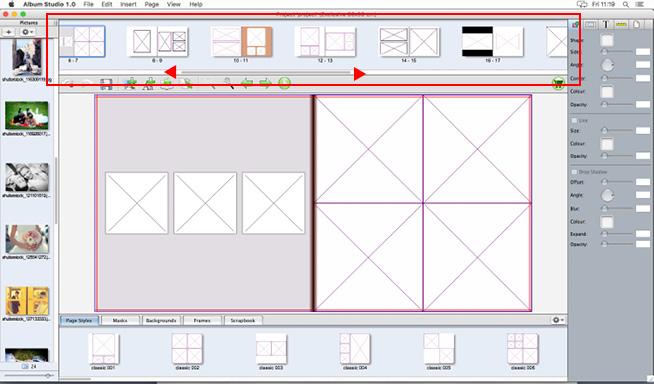
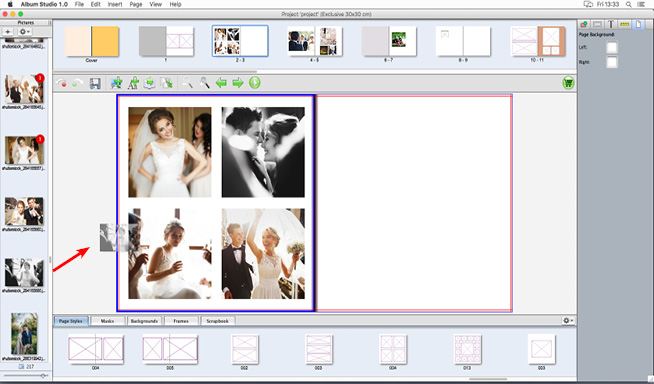
Page style (pre-set and customized)
This section contains all the page styles, that is, all the possible layouts you can use to design your own layout. They can be modified to suit your liking; to start your composition just drag the selected style to your workspace.
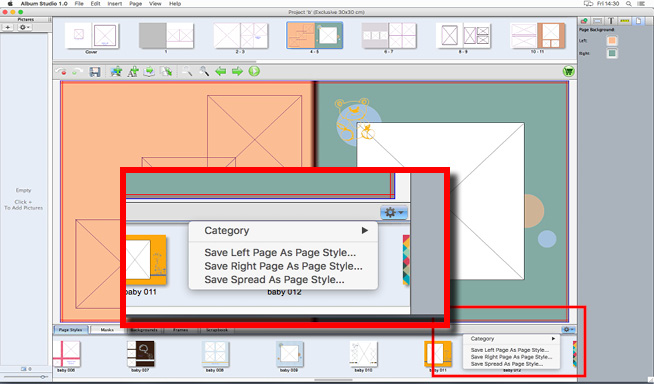
You can edit or create customized page styles and save them in your user’s library. To save the page style click on the clog-wheel (in the bottom right corner) and select to save the style of the right or left page, or of both facing pages.
This function will be particularly appreciated by users needing to re-create their design repeatedly in the same project or in different ones (for example, for two different weddings).
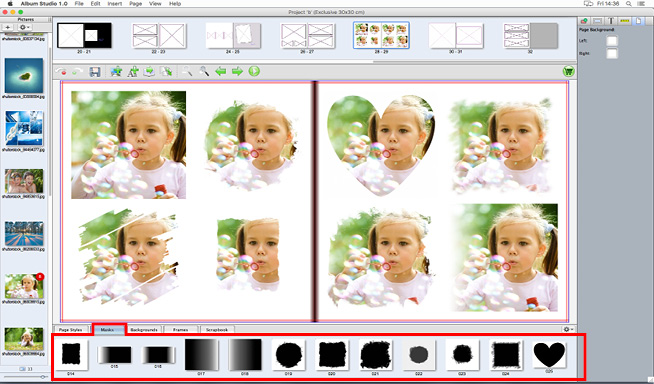
Masks
They let you hide or emphasize details of an image. They also include “fade” masks.
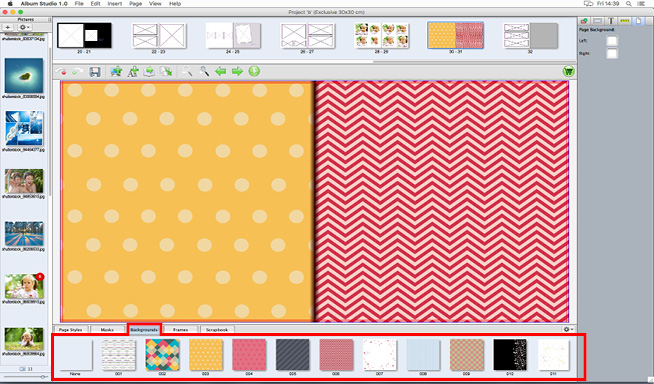
Backgrounds and textures
You can select theme backgrounds connected to particular events, such as weddings, birthdays, etc.
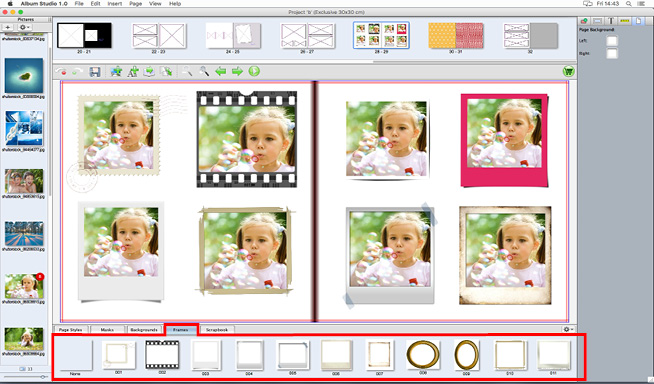
Frames
A wide range of elements suitable for framing photos, from geometric to traditional designs.
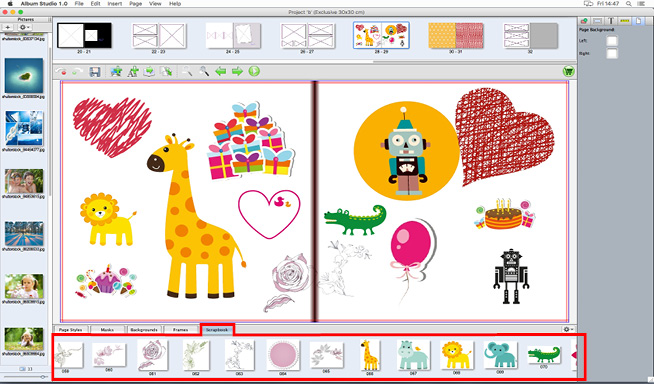
Gallery
Lastly, there is the section dedicated to clip art and decorative graphic elements. These will help you with the customization of your photo album.
5. Workspace and trimming
In this area you can design the layout, add photos and text and complete your layout. The following guiding elements have been added to facilitate your work:
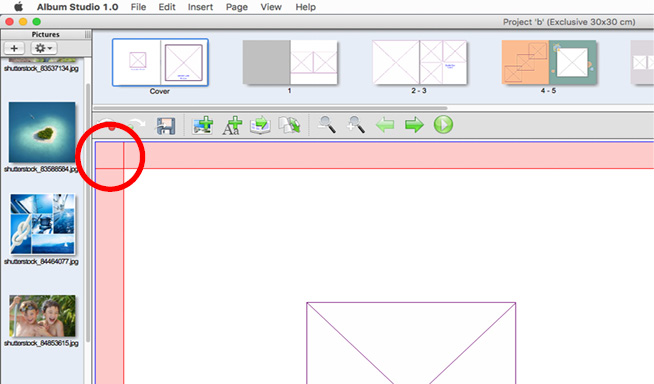
Bleed:
around the worksheet there is a red “border” whose height varies according to the type of selected page and product. This space is the bleed area. This is a measurement of key importance when your are positioning elements near the edge of the page. If you wish to add photos near the edge of the page, you must position them so that they cover the WHOLE of this red area, so as to avoid annoying uneven white lines in the prints. Once the red area is trimmed, it will NOT appear in the finished product (therefore avoid placing important parts of the photo in this area). Please do NOT place any elements on the first red line (the innermost one), as this could result in uneven cutting when binding the album.
Binding side:
if the album you are working on is soft bound (therefore cut along the centre), the workspace will consist of two facing pages with a black shade along the centre of the double page. This element will not appear in the print and it is there to indicate the millimetres that may not be clearly visible because of the soft binding.
That is why it is recommended that in products with this kind of binding you do not position important parts of your images in the exact centre of the double page.
Extra:
within all types of photo books we have provided further textual explanations on how to design the layout correctly, and take into consideration bleed and trim lines. These are non-printable elements and are there only for information purposes.
Non-printable elements:
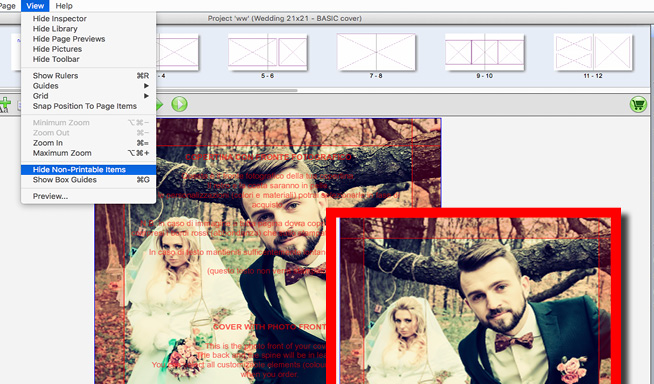
All non-printable elements can be momentarily hidden from view in the workspace by selecting in the menu bar: VIEW > hide non-printable elements.
6. Toolbar
This bar contains all the main functions for managing the work and the layout. With these tools you can edit your work quickly and easily.


Cancel Operation
Lets you cancel the last operation.

Restore Operation
Lets you restore the last cancelled operation.

Save
Lets you save your changes to the project.

Add Image Frame
Lets you add a new image cell, which will appear by default as a rectangle within the page.

Add Text Frame
Inserts a text cell inside the page in the workspace.

Automatic Upload
Lets you upload your images automatically from inside the project.

Change product
It lets you turn your layout into another size or another product category without having to start the layout from the beginning. The layout style will be automatically adjusted by the program. However, this may result in some unwanted shifting of elements on the page.

Zoom Out
With this tool you can reduce the view of the workspace.

Zoom In
With this tool you can magnify some areas of the workspace.

Previous page
Moves back to the previous page.

Next page
Moves forward to the next page.

Preview
Lets you see a preview of the end result of the project while you are working on it.

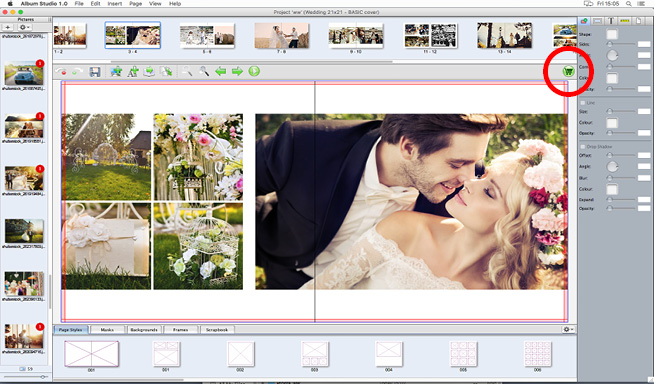
Buy
Lets you add your completed project to the cart.
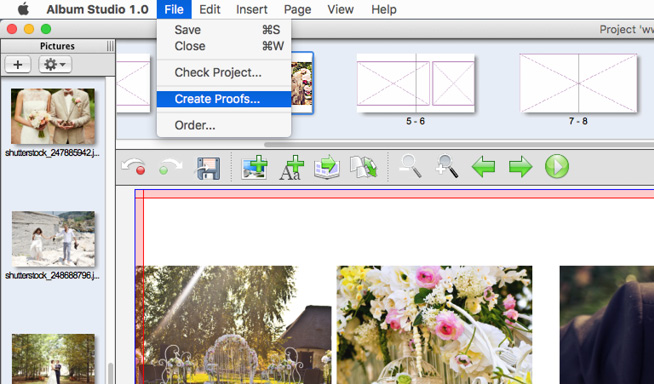
How to export a print preview
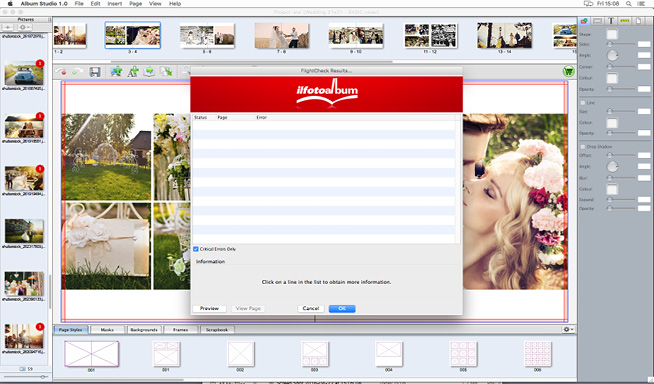
Before purchasing you can generate a test file to verify that the work was done correctly.
To export the test file click on FILE > GENERATE TEST.
The software will check the project for any errors, after which you select the type of format in which to export the test (jpeg, tiff, single page pdf or multiple page pdf), the pages to export (all the project or only a few pages), and the destination folder for the file to be exported.
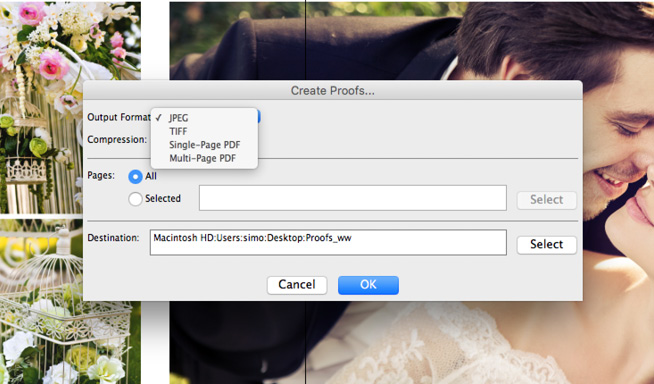
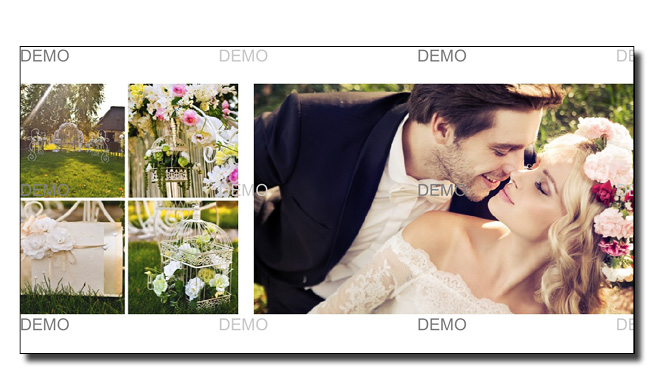
The words “demo” that appear in transparent writing on the files will obviously not appear in the final printing, and are there only to prevent their reproduction.
Purchase procedure
Before purchasing you need to save your project: click on the “save” symbol on the menu bar or on FILE > SAVE.
Start the purchase procedure with the “cart” button on the far right of the toolbar.
After clicking on it, the software will start checking the project and inform you of any errors, such as empty boxes, images with a resolution that is not suitable for printing, etc. It would be best to go back, check the errors and make the necessary changes.
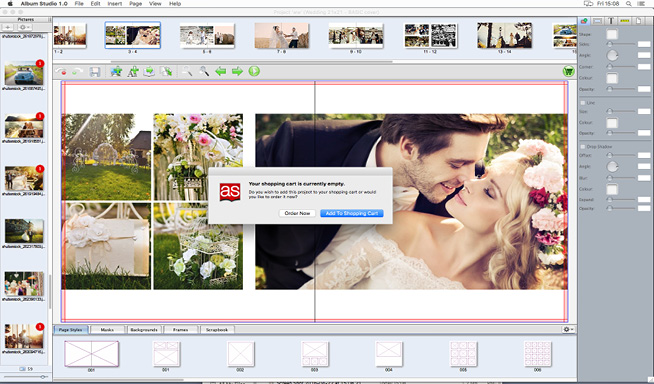
Now you will be given two options: put the product to the cart so that you can add other products before completing the order (a multiple order), or go directly to purchase (single purchase + any accessories selected during checkout).
By clicking on the “add to cart” button, you can add the project to the list of items to order; now you can exit the project and open a new project to add to the cart.
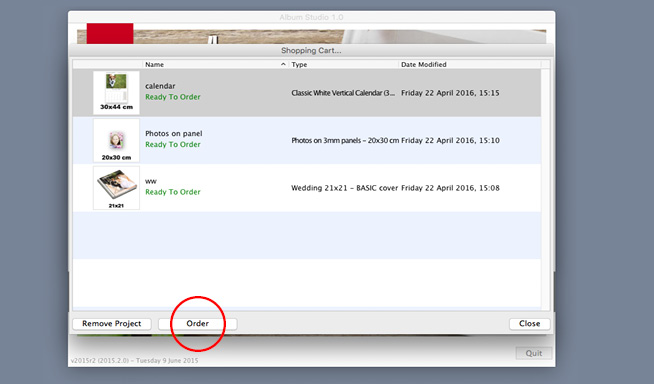
When all the projects you want are in the cart, you can complete your multiple order. To view your cart simply go to the software home screen and click on the “view cart” button. At this stage, should you decide not to buy a product, you can remove it from your cart by clicking on the “remove project” button. However, once the order is completed, you will no longer be able to delete projects.
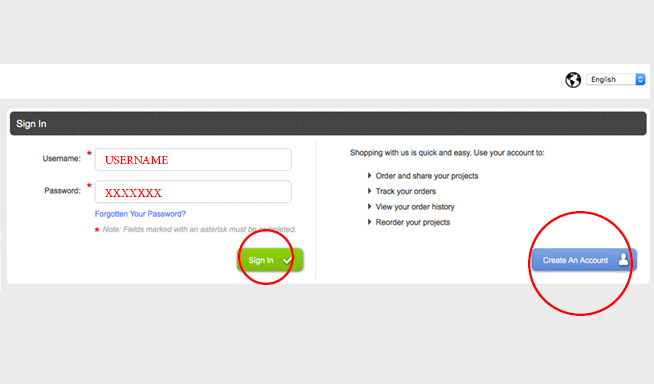
Accepting the conditions of purchase will open the web browser window where the user can sign in to his account and complete the purchase.
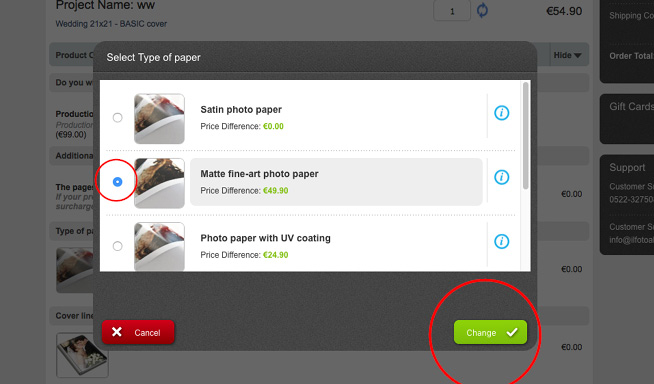
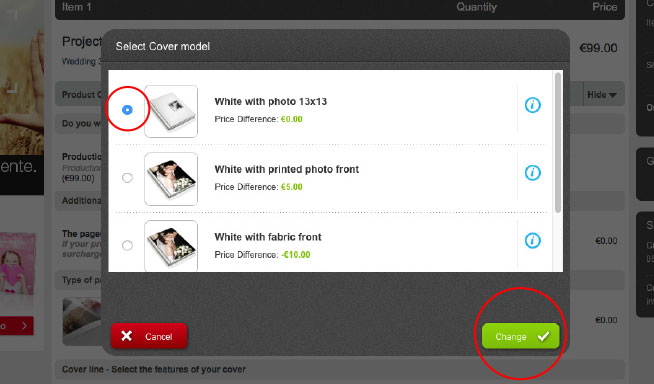
At this stage you can select from the different options available for some of the products, such as type of cover, type of paper for inside pages, etc.
Optional choices
All the optional choices (type of paper, extra finishes, type of cover, etc.) are selected at the time of purchase, after designing the layout and clicking on the purchase button in the software.
In order to access the product configuration interface you need to enter your personal details or register if you are a new user.
The name, type of product, quantity and price will be displayed in the cart. To increase the quantity of items just change the number and click on the rotating arrows on the right to update your order.
Next are the optional choices for the different products.
In the example shown one can select TYPE OF PAPER or TYPE OF COVER or PRODUCTION URGENCY to speed up production times for the product. In each case the options are selected by clicking on “add” or “change” button.
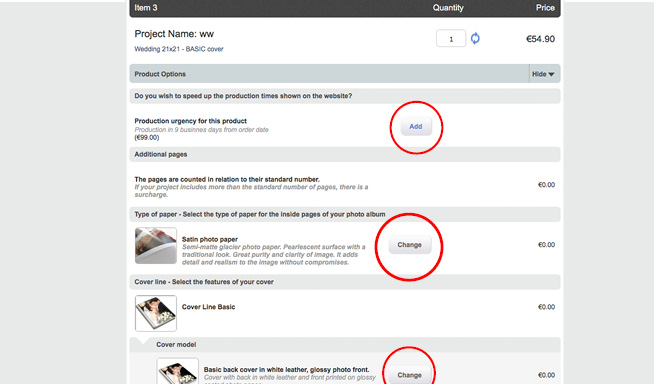
ADDITIONAL PAGES cannot be modified in any way when ordering. The corresponding surcharge is calculated automatically (through a software parameter).
You can select a TYPE OF PAPER other than the default one. Clicking on “change” will open a selection window with all the types of paper available for that product. Once you have made your selection, click on “change” (in the window) to confirm and customize your order.
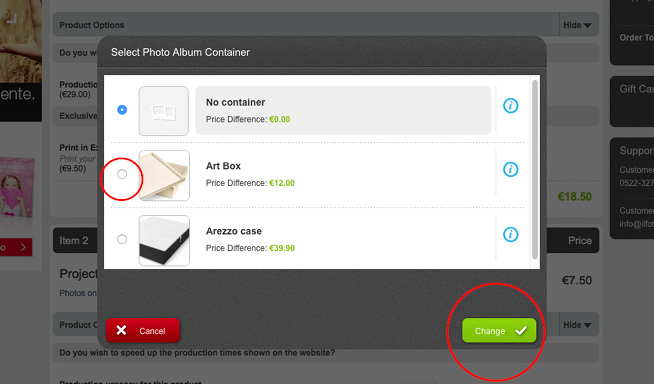
For photo books in the Wedding and Digital Wedding line you need to SELECT COLLECTIBLE COVERS, through the following two steps. First, choose the cover line by clicking on “change”. Next, select the cover type within the selected line. Matching cases and briefcases are available for some types of covers (for example, for the Collectible covers, with containers made with the same material and in the same style as the cover). To add them to the cart click on “add” and the total amount will be recalculated.
At this stage of the order, with some of the photo books in the Wedding Line and Photogold Line you can also select the PARENTS PACK and WITNESSES PACK.
There are optional CONTAINERS available for all photo books, regardless of the type of selected cover.